
Nuova Simonelli Oscar needs water
-
MiddletonDon
- Posts: 6
- Joined: 1 year ago
Greetings.
Thank you for all the knowledge you've contributed regarding this topic, however, I'm still at lost why this machine is not working like it should. I suppose the water level sensor is like the secondary switch that if it's not working properly, the boiler does not heat up, as this does. It can release water from the brew head, when brew button is pressed when the machine is on. Boiler water sensor has been cleaned, and it wasn't dirty to begin with. Thank you for your help
Thank you for all the knowledge you've contributed regarding this topic, however, I'm still at lost why this machine is not working like it should. I suppose the water level sensor is like the secondary switch that if it's not working properly, the boiler does not heat up, as this does. It can release water from the brew head, when brew button is pressed when the machine is on. Boiler water sensor has been cleaned, and it wasn't dirty to begin with. Thank you for your help
-
MiddletonDon (original poster)
- Posts: 6
- Joined: 1 year ago
a new pump has been installed since this video, machine is now more quiet. Thanks again for your response.
-
WWWired
- Posts: 352
- Joined: 5 years ago
Hi MiddletonDon 
Superb video that will be very helpful to many in the future and demonstrates the functioning/possible-fault present in this machine very well.
Important Note: There are two hydraulic systems in the Oscar I and II Heat Exchange (HX) Machines (the larger two liter boiler for the Steam System that is approximately the size of a 2 Liter bottle of Soda, and the other hydraulic system is the the Heat Exchange/Brew Group hydraulic Circuit). The two Hydraulic Circuits are completely Separate hydraulically but do come in contact with each other for thermal heating of the Heat Exchange hydraulic pathway. The only part of the machines hydraulic system that is shared by the Steam Hydraulic System and Brew/HX Hydraulic System is the supply section from the Water Reservoir to the two-way Splitter assembly that branches in two directions one to the 2-way solenoid that supplies water to the lower fitting on the Steam Boiler (again the one about the size of a two liter soda bottle) and the other branch to the non-return (one-way) check valve that supplies the HX (Heat Exchanger)/3-way Solenoid/Brew Group line.
Observations: (there are many Sound/Audible cues from the pump here)
Possible Fault Narrowing:
And an example of Mineral Scale/organic debris Blocking Oscar Steam Boiler Fill Lines:
NOTE: be sure the machine is unplugged whenever reaching inside the case. Some of the components inside the machine have full current being passed directly to them and this can do some very serious harm.
Notes:
Superb video that will be very helpful to many in the future and demonstrates the functioning/possible-fault present in this machine very well.
Important Note: There are two hydraulic systems in the Oscar I and II Heat Exchange (HX) Machines (the larger two liter boiler for the Steam System that is approximately the size of a 2 Liter bottle of Soda, and the other hydraulic system is the the Heat Exchange/Brew Group hydraulic Circuit). The two Hydraulic Circuits are completely Separate hydraulically but do come in contact with each other for thermal heating of the Heat Exchange hydraulic pathway. The only part of the machines hydraulic system that is shared by the Steam Hydraulic System and Brew/HX Hydraulic System is the supply section from the Water Reservoir to the two-way Splitter assembly that branches in two directions one to the 2-way solenoid that supplies water to the lower fitting on the Steam Boiler (again the one about the size of a two liter soda bottle) and the other branch to the non-return (one-way) check valve that supplies the HX (Heat Exchanger)/3-way Solenoid/Brew Group line.
Observations: (there are many Sound/Audible cues from the pump here)
- 0:08 to 1:23 of Video: The machine is turned on, and quickly the pump can be heard to develop greater resistance (it becomes quieter, slightly muted/muffled).
- 0:36 of Video: The first drop of water appears from the Grouphead . . . this is not unexpected as the pump would be pushing at approximately 15 bar of pressure into the HX/Brew Group Hydraulic Path and this is a higher pressure against the 3-way Solenoid which might be forgiven for letting a drop or two pass every few seconds under increased pressure over time. Might be a little bit of descale would benefit it to get a perfect seal as a future consideration.
- 1:30 of Video: It appears that the 3-way Solenoid functions properly as the call for water at 1:30 of the video does produce water. This should eliminate any blockage in the HX Tube including the Water Supply from the Water Reservoir/Tank to the 1-way Check Valve and into the Heat Exchange Tube. The sound from the pump during this call for water is a normal pump sound indicating the resistance/pressure in the HX hydraulic system appears to be normal. This means Water is at least entering the HX hydraulic system from the Water Reservoir and past the two way water line splitter and past the one-way check valve . . . whether the water is being allowed to back flow from the HX line past the one-way check (non-return) valve is yet to be determined, but for now, we could rule that out.
- The Water Level Sensor (a single probe that is screwed into a fitting on the top of the Steam Boiler) has been inspected and cleaned. The pump is being energized when the machine is turned on indicating one of two things:
- The circuit responsible for detecting continuity between the Water-Level-Sensor-Probe and the ground of the Steam Boiler is not functioning; or
- The Steam Boiler is not being filled and therefore water is not touching the Water-Level-Sensor-Probe (needed to develop continuity in the circuit which will shut the pump down as this would indicate the Steam Boiler has the correct amount of water in it).
Possible Fault Narrowing:
- Is the Steam Boiler being filled: One good diagnostic (if you haven't already noted when removing the Water-Level-Sensor-Probe for cleaning) might be to remove/unscrew the Water-Level-Sensor Probe again (since you know you can remove it already) and if you have a chopstick or a bamboo skewer take a water level reading of how much water is in your Steam Boiler. If there is enough water in the Steam Boiler to touch the bottom of the Water-Level-Sensor-Probe, then this might be one area that needs further consideration. Also good to check the Water-Level-Sensor-Probe when removing it to see if it is has any water on it (as water needs to touch the Water-Level-Sensor-Probe to complete the circuit and develop continuity between the Water-Level-Sensor-Probe and Steam Boiler circuit).
- Fittings from 2-way Solenoid to Steam Boiler Fill Fitting: Note: be sure not to put any Twisting/Torque force on the fittings attached directly to the Steam Boiler. There is usually a way to put two wrenches on the fitting and what ever it is attached to in order to just put force on the actual fitting and not the boiler . . . the risk is warping the thin metal of the boiler or bending/denting it and thus creating a crack in the boiler, therefore be sure to always be using two wrenches when loosing the fittings. If the Water Level is ok in the Steam Boiler and water is just touching the Water-Level-Sensor-Probe (not over-filling the boiler) then next would be to check the fittings (see photos below for what a mineral/debris obstruction can look like) and the hose from the 2-way solenoid (labeled red "6" in the photo below, all photo/annotation credit to Elektros.it) to the bottom T and L shaped fittings connection at the bottom rear side of the Steam Boiler (do not remove the L-shaped fitting at 7, just undo the T-Fitting using two wrenches . . . one to hold the L-shaped fitting and one to undo first the ring-nut and then turn the T-shaped fitting loose of the L-shaped fitting that threads directly into the Steam Boiler at bottom read of the Boiler. Before removing the T-shaped fitting, however, just unscrew the compression nut on top of the T-shaped fitting and see if you can see inside the fittings to notice any mineral scale build up or other obstruction . . . if nothing obvious in the T-shaped fitting when looking in from the top, then try to find something thin and flexible that you thread a little ways into the T-shaped fitting and L-shaped fitting to see if any debris or signs of minerals are there or if there is a clear passage. NOTE: have something you put below the machine to catch any water that may be in the Steam Boiler when you loosen/take the fittings off to inspect them.
- Checking the 2-way Solenoid (both Coil and metal plunger): Note: never put a pair of pliers on the metal tube that runs through the center of the Solenoid Block (there is a ring nut and wrench fitting to unscrew the plunger body from the inlet/outlet port housing. If the Water-Level-Sensor-Probe/Water Level is ok, and the fittings/hoses from the 2-way Solenoid to the Steam Boiler not blocked in any way, then the next thing to do is check the 2-way Solenoid (Using a Digital Multimeter) for function (both the Coil Block and Plunger/Piston assembly for any blockage/faults that is in the center of the black CEME Coil Block). This can be done later if there appears to be no blockage of the hoses/fittings and the Steam Boiler/Water-Level-Sensor-Probe check out;
- Finally, if all those three things check out (the Boiler fill sensors, the fill hoses/fittings, and the 2-way solenoid) then the final thing to check out is the electrical and brain box components (a very very very rare issue that only needs considering if the other three items are ruled out).
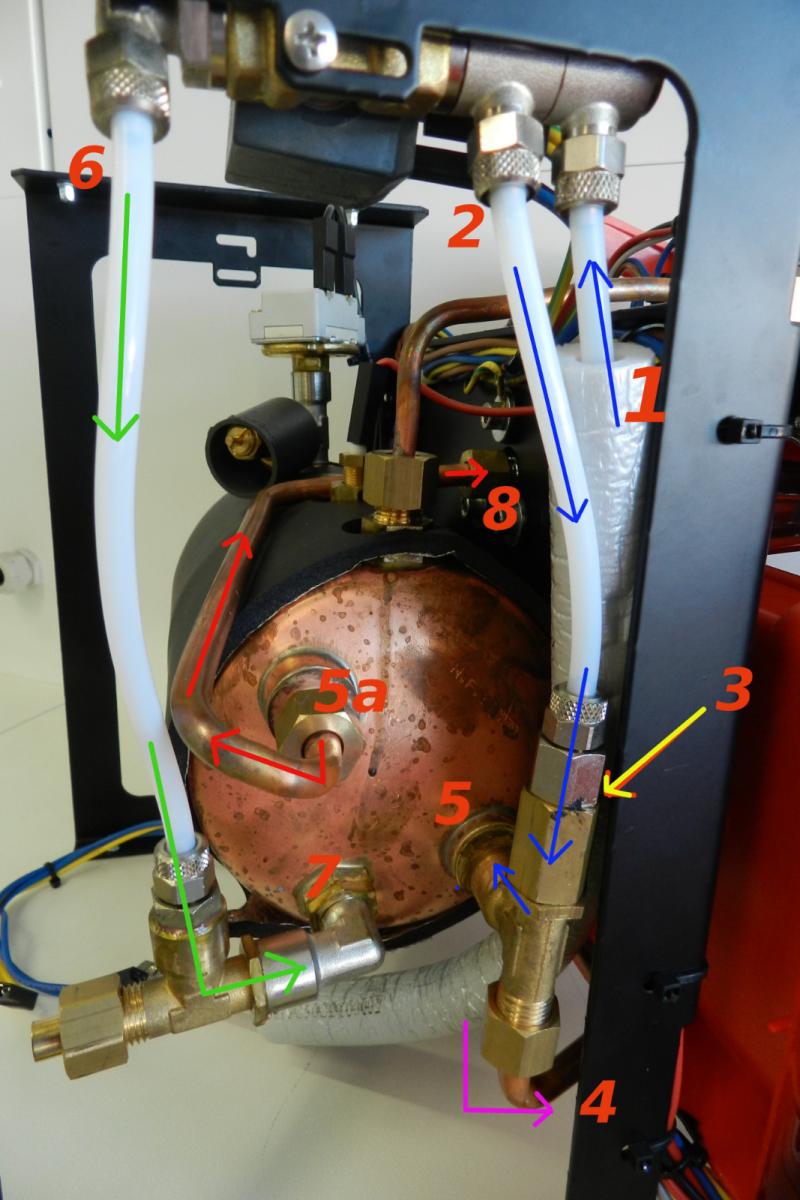
Exploded View of 2-way Solenoid Assembly for Nuova Simonelli Oscar I:In the fantastic annotated Elektros' diagram above, water passes from the Pump through line "1" up into the two-way fitting that splits the water in two directions . . . first downward through the hose labeled "2" (into the Heat-Exchanger/GroupHead water pathway), and also then left (to the Steam Boiler water pathway) to the Black Block (the 2-Way Solenoid) in the photo, which remains closed unless the 2-way Solenoid/Black Block's Coil is energized due to a lack of continuity between the Steam Boiler and Water-Level-Sensor-Probe (water not connecting the Boiler Wall and Probe Tip) or if there has been no call for hot water/extraction when an operator presses the shot call buttons on the front of the machine. This means that the 2-way Solenoid is Normally Closed (N.C.) unless the machine needs water (water isn't touching the Water-Level-Sensor-Probe bottom tip or the operator hasn't called for hot water using the buttons at front). If the 2-Way Solenoid is opened (the coil is energized) and switches to the Normally Open (N.O.) state, and this energizes the electro-magnet in the Black Block, this will then cause the center solid metal cylinder (a magnetic block called plunger or piston) to slides upward a few millimeters (1/8th of an inch) in the center of the metal tube/shaft (called the Plunger or Piston Body) that is inserted in the center of the 2-way Solenoid Black Block and held in place with a washer and ring-nut usually (see annotated picture below for exploded view of parts). If the solenoid is energizing properly, and the piston/plunger moves upward in the piston/plunger tube then this will open the channel for water to pass into water tube "6" and downward to the T-Fitting and then in the picture above to the right into the L-shape fitting that is directly threaded in the bottom back of the Steam Boiler, which is the Fill hole/fitting. For completeness of discussion, red "5" in the annotated photo above is the fill and HX-Return Fitting where Water enters the elongated C-shaped Heat-Exchange (HX) Tube which has its lower half submerged in the Steam Boilers internal Water and is right next to (but not touching) the Heating Element. The diameter of the HX tube is evident by looking at the fitting on the outside of the Steam Boiler where the HX Line enters the steam boiler (again, position "5") and is about 1 inch (just over 2cm) in diameter. The HX (Heat-Exchange) tube's exit fitting from the Steam Boiler can be seen in the Elektro's Annotated Photo above at position "5a" and from there it travels to the 3-way-solenoid and Brew Group and then returns in a loop to position fitting "5" in the above photo again. This ensures water is continuously heated in the HX-Loop. All these lines must be completely sealed with no leaks to the outside atmosphere.
And an example of Mineral Scale/organic debris Blocking Oscar Steam Boiler Fill Lines:
NOTE: be sure the machine is unplugged whenever reaching inside the case. Some of the components inside the machine have full current being passed directly to them and this can do some very serious harm.
Notes:
- The Heating Element will not energize unless continuity is established between the Water-Level-Sensor-Probe and Steam Boiler Wall (due to water touching both the Water-Level-Sensor-Probe and the Copper-Steam-Boiler metal wall. This is a safety feature to avoid the Heating Element from being energized with an empty Steam Boiler and getting hotter than the Sun and the reactors at Chernobyl and thus melting into a pile of metal slag;
- 1:24 of the Video, the machine shuts the pump down . . . this is also a safety feature designed by Nuova Simonelli into their Oscar Professional to keep the pump from overheating and possibly destroying the diode that controls the pumps half-wave circuit energizing/de-engergizing to protect the pump from being damaged
-
MiddletonDon (original poster)
- Posts: 6
- Joined: 1 year ago
Greetings.
Thank you for your analysis of former video. Like mentioned, new pump was installed. Water probe has been cleaned and reinserted. There's a plethora of things i did that did not result to preferred and promising outcome, yet the sum of all those efforts lead to this video.
Thank you for your analysis of former video. Like mentioned, new pump was installed. Water probe has been cleaned and reinserted. There's a plethora of things i did that did not result to preferred and promising outcome, yet the sum of all those efforts lead to this video.
-
WWWired
- Posts: 352
- Joined: 5 years ago
Your HX Hydraulic Pathway looks functional . . . and the electrical components seem to be operating well. Are you still getting the problem filling the Boiler where the machine shuts the pump down at about 90 seconds (the safety feature?)
Nuova Simonelli Machines are incredible. They are the foundation upon which much of the Espresso Machine community was built and advanced strongly. The Oscar/Musica machines in particular contain all the components necessary to be in the highest quality grouping of espresso machines. The next steps up are machines with Rotary Vane Pumps, but one fantastic advantage of Vibratory Pumps machines is they do not have to be plumbed in. The engineering and design of these types of Espresso Machines is exceptional and your journey and videos will assist many MiddletonDon and you have gained a huge amount of knowledge by getting inside one of these machines! They are amazing and awesome!
Nuova Simonelli Machines are incredible. They are the foundation upon which much of the Espresso Machine community was built and advanced strongly. The Oscar/Musica machines in particular contain all the components necessary to be in the highest quality grouping of espresso machines. The next steps up are machines with Rotary Vane Pumps, but one fantastic advantage of Vibratory Pumps machines is they do not have to be plumbed in. The engineering and design of these types of Espresso Machines is exceptional and your journey and videos will assist many MiddletonDon and you have gained a huge amount of knowledge by getting inside one of these machines! They are amazing and awesome!
-
MiddletonDon (original poster)
- Posts: 6
- Joined: 1 year ago
Good morning. I'm very excited to make a latte this morning. But sad to see the Oscar back to where we were. Purged the group head a few times but doesn't work. What am I missing? Thank you for your kind words it encourages me to keep checking and not be frustrated.
...to answer your question, the pump goes on for about 90 mins and decides theres no water in the tank.
Best regards
...to answer your question, the pump goes on for about 90 mins and decides theres no water in the tank.
Best regards
-
MiddletonDon (original poster)
- Posts: 6
- Joined: 1 year ago
Here are the new pix from my latest adventure. Fitting now been sitting in lemon juice, so far been cleared but will soak some more. I was testing connection between boiler and the water probe, although it did not show connection, it triggered the heating lamp. The pump ran after some time then heater lamp comes on while the testing tips are on
-
WWWired
- Posts: 352
- Joined: 5 years ago
Brilliant Don!!! . . . you found a blockage! . . . there could be more of course in the L-shaped fitting at location "7" (see photo above) threaded directly into the Steam Boiler so might be worth checking to see if there is an open channel there.
Descaling:
If you have a local Brew-Making or Wine Making Supply store near you, you can ask if they have bags of "Citric Acid". This usually will cost just a few dollars ($5 to $10) for a 1Kg (2.2 pounds) bag of what looks like salt or sugar crystals. If you mix 2 Tablespoons in 600 ml (just over half a quart) of water, that is a normal descale solution. Citric Acid is a better "weak acid" than Vinegar (Acetic Acid) because Citric Acid is not a monoprotic acid (like vinegar) and is, over longer-periods of time, less corrosive (although vinegar is not all that corrosive either). A big advantage of Citric Acid is it has no odor or taste. Like Vinegar, Citric Acid is found in many food items and in small amounts and low concentrations is very safe. When using Citric Acid in higher concentrations (like descaling/removing mineral scale buildups) it is good to consider wearing eye-protection. Citric Acid is actually cheaper than vinegar and is slightly more powerful at removing mineral scale than Vinegar (Acetic Acid). If you, or someone you know, might have an ultrasonic cleaner, that can speed the Citric Acid/Vinegar descale process, sometimes very dramatically. A quick check of wally world's online offerings show a wide variety of very inexpensive ultrasonic cleaners to mid-level medium sized, to higher-end larger ultrasonic machines, including some very simple small ultrasonic cleaners for just doing a bit of jewelry that might be able to fit a small pipe fitting connector. I've even heard of people using an old foot bath that does vibrating/massage as an makeshift ultrasonic bath lol . . . thrift shops sometimes have these for $5 or $10 bucks too
It might be necessary to do several baths with Acetic or Citric Acid as the minerals will combine with the acids and eventually exhaust the chemical reaction occurring. Therefor its ok to replace the solution every so often with a fresh batch of the weak acid (Citric or Acetic/vinegar).
Always using filtered water is a good idea with any high quality espresso machine like the Nuova Simonelli Oscar. Regular descaling can help also keep such mineral deposits from developing.
A Valuable Sign:
The T-fitting shown in your photo indicates the presence of a rather large amount of mineral scale in the machine. It will be a good idea to check all fittings and consider engaging in a temporarily more frequent/regular descaling regiment of the machine to remove the mineral scale. It is possible there will be some other mineral scale in other fittings or pipes and so using a descaling solution to remove the mineral buildups over time will help. Keep in mind that it may happen as well that piece of mineral scale breaks free and could block a small opening, but not a problem, there's always lots of folks (many whom I have learned from too over the years) here on Home-Barista to help track down the location and solution!
Fantastic you've located a significant blockage between the 2-way Solenoid and Steam Boiler fill fitting Don!! Awesome! And your videos and photos are going to assist a great number of folks who experience a similar issue!
-
MiddletonDon (original poster)
- Posts: 6
- Joined: 1 year ago
Thank you, your words are very encouraging. Any advice as to how to remove the L fitting, with the little loosening i did, it somehow bent the boiler at the attachment. Best regards. PS, I've been happily brewing my morning espresso, this steamer is much stronger and hotter than my Gaggia classic. New curve to learn
