
Replacing boiler element on '79 La Pavoni Europiccola
-
medicalcoffee
- Posts: 14
- Joined: 4 years ago
Hi all,
First, thank you for all your help in restoring this beautiful machine! Pulling shots the last few months have been a pure joy and I even brought it to work during overnight shifts and shared the joy of espresso with my colleagues at the hospital.
Unfortunately, I fried the twin copper boiler heating element today, which will need replacing.
From what I saw on Francisco's Website, the quickest fix would be to get the new metal replacement part but I'm not familiar with the new wiring, is there a good diagram and wire/fuse kit somewhere? https://www.theespressoshop.co.uk/en/La ... -2193.aspx
Alternatively, I can restore the original boiler with Gabor but this seems like a very long process.
Any advice will be appreciated!
-
drgary

- Team HB
- Posts: 14393
- Joined: 14 years ago
Wouldn't the wiring be the same with the new replacement dual coil element? Hopefully you took pictures of the wiring before removing your fried element.
Otherwise wiring would be similar to this next later model on Francesco Ceccarelli's website. You could add an inline heat fuse where the thermal safety switch is.
http://www.francescoceccarelli.eu/La_Pa ... resist.JPG
Otherwise wiring would be similar to this next later model on Francesco Ceccarelli's website. You could add an inline heat fuse where the thermal safety switch is.
http://www.francescoceccarelli.eu/La_Pa ... resist.JPG
Gary
LMWDP#308
What I WOULD do for a good cup of coffee!
LMWDP#308
What I WOULD do for a good cup of coffee!
-
Alslaw
- Posts: 177
- Joined: 7 years ago
It looks like you have the bolt-in element, so you can even upgrade it to the single element with a pressurestat. I am in the process of rebuilding a 1979 LPE with a blown element. I am going to upgrade the element setup to include the pressurestat. This is a good thread that goes over the process of the upgrade: Building the Ultimate La Pavoni Europiccola
LMWDP # 606
-
forbeskm
- Posts: 1021
- Joined: 11 years ago
You can go with a new stainless element from Stefanos espresso care. You can either go the like for like which requires crimpings some new connections, in fact both options will. Option two is adding a pressurestat element with more work. Or option three with Gabor, i have done option 1 and 3. Pressurestats are not for me 
-
drgary
- Team HB
- Posts: 14393
- Joined: 14 years ago
On these old machines the 200W element and venting steam at the pressure release valve maintains a nice temperature. The one coil element with a pressurestat is hard to adjust low enough to barely power it comparable to the 200W coil. At least that's my experience with the previous generation group with a brass sleeve insert.
Gary
LMWDP#308
What I WOULD do for a good cup of coffee!
LMWDP#308
What I WOULD do for a good cup of coffee!
-
Alslaw
- Posts: 177
- Joined: 7 years ago
I don't mean to hijack this thread, so feel free to PM me Or split this off to another thread if that is more appropriate, but I am very interested to hear your experiences with the pressurestat on the Pavoni. I am currently using a 67 cremina, and I assumed the Pavoni would behave similarly with a pressurestat ... any ideas why it's different? Thanks!
LMWDP # 606
-
drgary
- Team HB
- Posts: 14393
- Joined: 14 years ago
You're dealing with an early version La Pavoni designed to keep its equilibrium through minimal heating, radiating from the group and a cast, plain steel base compared to a Cremina where the frame, boiler and group have their own heat radiation. Early 2nd gen Pavonis like this may easily overheat because the group is steam heated. The group on the Cremina and 1st and 3rd gen Pavonis are water heated, so they don't overheat as easily. A single boiler manual lever is a compromise so it doesn't overheat but provides enough steam power. The Cremina's steaming is adequate but not as strong as steaming on a dual element Pavoni with the large coil activated. The cast base on my 1st gen Pavoni with the single coil heating element gets too hot. The stamped steel bases in later models don't radiate as much heat. I could go into the effects of these differences. Let's say the 67 or 2nd gen Cremina was designed to maintain both brew temp and steam pressure. The 3rd gen Pavoni approaches that with much cheaper materials. The 1st gen Pavoni or Cremina (the latter was a rebranded and improved La Pavoni Europiccola) accomplish stable brew temp with gentle heating and venting and sufficient steam pressure with much higher power.
Gary
LMWDP#308
What I WOULD do for a good cup of coffee!
LMWDP#308
What I WOULD do for a good cup of coffee!
-
medicalcoffee (original poster)
- Posts: 14
- Joined: 4 years ago
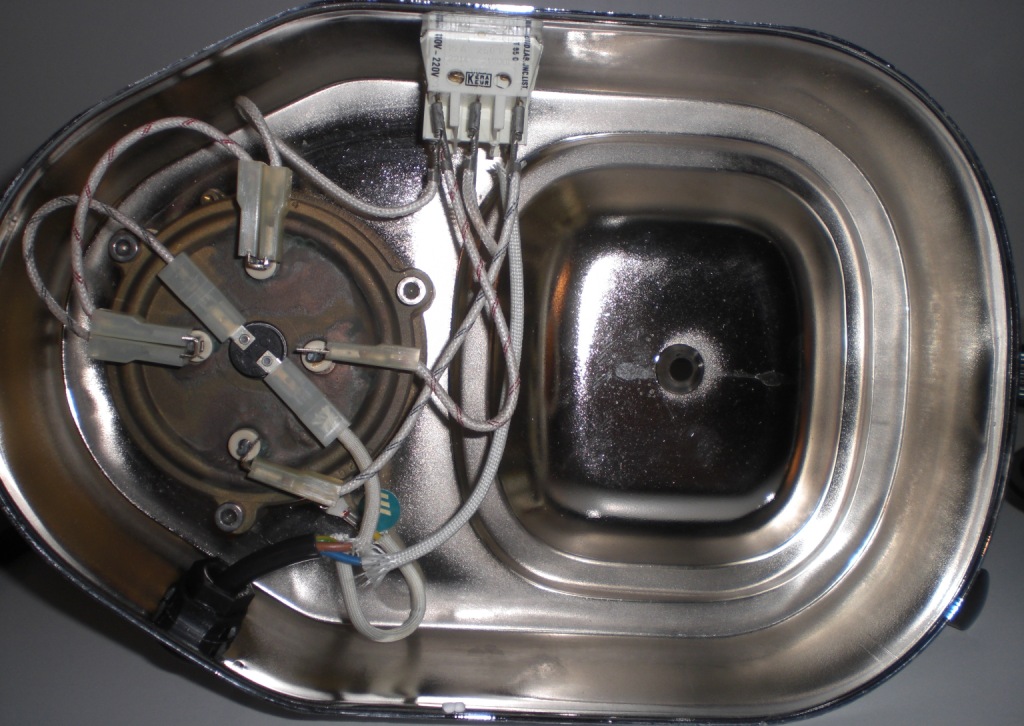
Success!!! I'm back in action
I managed to replace the element with a new steel element from UK.
https://www.theespressoshop.co.uk/Mobil ... -4041.aspx
I got shorter bolts from ACE hardware and new silicon wire and disconnects from Amazon.
I also took this opportunity to strip the rusty base with wire brush drill attachment and then spray coated with high temp anti rust paint from Home depot.
-
caeffe
- Posts: 467
- Joined: 17 years ago
Congrats on being able to make espresso again!
I may be in the same boat as you.
Filled it up and plugged in my 2 switch europiccola, with the switch off and the GFCI tripped immediately. If i plug it in without water, it doesnt trip the GFCI.
When I emptied the water, a lot of black carbon looking stuff came out.
I'll have to check the elements continuity.
How long did it take to ship from the UK?
LMWDP #162
-
civ

- Posts: 1148
- Joined: 17 years ago
