
La Pavoni Professional - Can't find short
-
Rospresso
- Posts: 18
- Joined: 1 year ago
Hi,
I am a total novice here. I just received my in-law's ca. 1980-85 La Pavoni professional. It's not working. Here is the story so far:
1) When I first got it, I filled the reservoir halfway and turned the machine on. The light on the switch came on, but there was no heat.
2) I turned the machine off and started reading. Meanwhile, I put some diluted white vinegar in the boiler to descale the heating element (scale was visible). I left the vinegar (probably 1 part vinegar to 5 parts water) overnight.
3) I began tesing the electrical elements with my multimeter today. There was no continuity across the thermal fuse, so I removed it, twisted the wire back together with a twist cap, and went to see if bypassing the fuse would allow the machine to heat up. Now, turning the machine on immediately flips the circuit breaker.
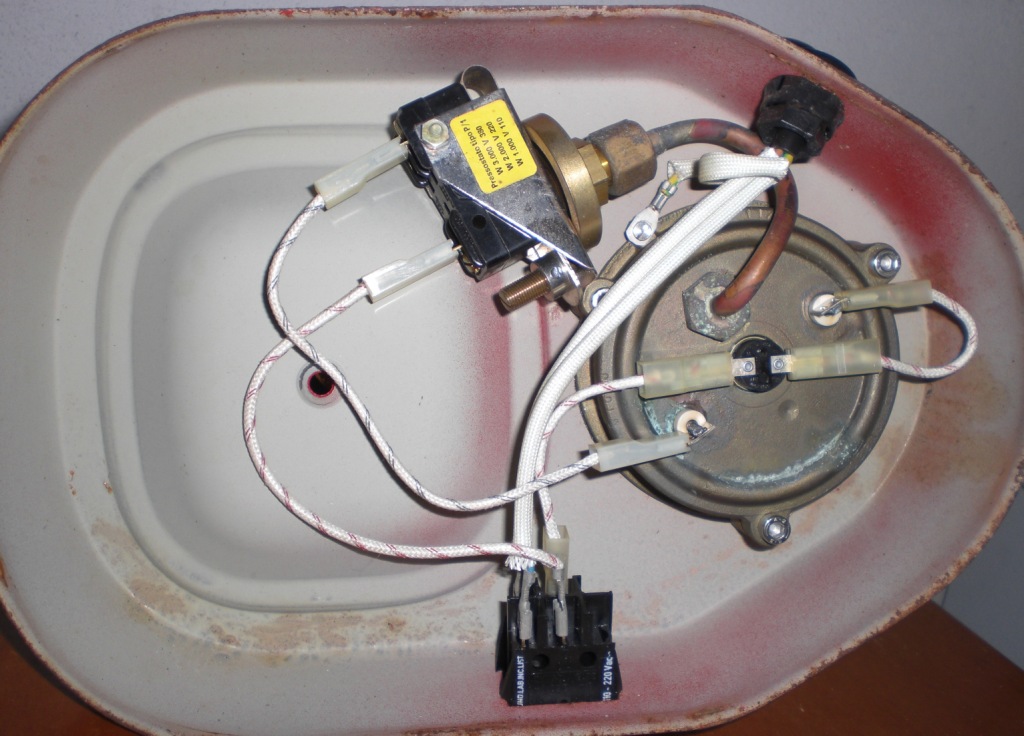
There's a short somewhere but I can't imagine where! Please see the below before/after images of the setup. Can anyone see where I've messed up?
Before:
After:
Some notes:
-The impedance of my reconstituted wire was 0.5 Ohms
-The impedance across the heating element terminals after descaling is holding steady at 13.5 Ohms
-I'm not sure what continuity I'm supposed to see across the Pstat, but I got none on my meter (between the ends of white wire)
Thank you so much for your help!
I am a total novice here. I just received my in-law's ca. 1980-85 La Pavoni professional. It's not working. Here is the story so far:
1) When I first got it, I filled the reservoir halfway and turned the machine on. The light on the switch came on, but there was no heat.
2) I turned the machine off and started reading. Meanwhile, I put some diluted white vinegar in the boiler to descale the heating element (scale was visible). I left the vinegar (probably 1 part vinegar to 5 parts water) overnight.
3) I began tesing the electrical elements with my multimeter today. There was no continuity across the thermal fuse, so I removed it, twisted the wire back together with a twist cap, and went to see if bypassing the fuse would allow the machine to heat up. Now, turning the machine on immediately flips the circuit breaker.
There's a short somewhere but I can't imagine where! Please see the below before/after images of the setup. Can anyone see where I've messed up?
Before:
After:
Some notes:
-The impedance of my reconstituted wire was 0.5 Ohms
-The impedance across the heating element terminals after descaling is holding steady at 13.5 Ohms
-I'm not sure what continuity I'm supposed to see across the Pstat, but I got none on my meter (between the ends of white wire)
Thank you so much for your help!
-
Uriah
- Posts: 13
- Joined: 2 years ago
One thing to check is whether the heating element is shorted to the base:
https://www.orphanespresso.com/Olympia- ... 620-1.html
The pressurestat should have continuity at room temp. It cuts off the heating element at the configured pressure/temperature
https://www.orphanespresso.com/Olympia- ... 620-1.html
The pressurestat should have continuity at room temp. It cuts off the heating element at the configured pressure/temperature
-
homeburrero

- Team HB
- Posts: 4894
- Joined: 13 years ago
13.5 ohms across the element terminals is good. When cold, you should have good continuity across the pStat. (When up to pressure that switch should open and the machine stops heating.)
It looks to me like the switch is wired incorrectly in both those pictures. If that's the stock DPST switch, the two wires from the cord need to go to the same side of the switch. The way it looks to me in the picture, one pole of the switch would be connecting the cord's black wire to the white wire when the machine is switched on -- fireworks!
Any chance that you changed the wiring before taking the pictures?
Here's a post with a wiring diagram for the LP Pro: La Pavoni Professional Wiring Diagram, and see the pictured wiring on Francesco Ceccarelli's website: http://www.francescoceccarelli.eu/La_Pa ... r/pr84.JPG which resembles yours except for the newer style thermofuse.
Pat
nínádiishʼnahgo gohwééh náshdlį́į́h
nínádiishʼnahgo gohwééh náshdlį́į́h
-
Rospresso (original poster)
- Posts: 18
- Joined: 1 year ago
There is a small chance I changed the wires - I had unplugged a few things but put them back seconds later to take the picture. I'll reset everything according to the wiring diagram and test the thermofuse bypass again. Thank you for catching that - just the sort of rookie mistake I'd make at this point in the process! I did test for a short at the element base and found no continuity between the base and the terminals. I was also able to get some continuity across the pressurestat with the wires removed, so I'm hoping that's still good.
Thank you all for your help! I want to sort out the electrical issues before I go ahead with any other restoration/mods.
Thank you all for your help! I want to sort out the electrical issues before I go ahead with any other restoration/mods.
-
Rospresso (original poster)
- Posts: 18
- Joined: 1 year ago
All,
I'm ordering the Orphan Espresso gasket replacement kit for this machine and I wondered a couple of things:
1) Do I need to replace the stainless snap rings/washers ec.? I'm inclined to do it but I wondered if these parts actually wear.
2) Are there any high-impact upgrades/mods I should be considering? I liked the look of this one: https://coffee-sensor.com/product/bong- ... la-pavoni/. I'm almost always going to be pulling multiple shots with this machine (at least two, often three). Has anyone used that isolator, or something similar? Does it make a difference? Is there anything else that's a no-brainer upgrade since I'm taking the thing apart?
Thank you!
-
Blernsball
- Posts: 109
- Joined: 2 years ago
If you are ordering from Orphan espresso, the dosing funnel they make is really nice. It has a great weight to it and sit solidly on the portafilter. Works well if you are WDTing.
https://www.orphanespresso.com/OE-IPANE ... _2540.html
A IMS basket is also a nice upgrade.
https://www.orphanespresso.com/OE-IPANE ... _2540.html
A IMS basket is also a nice upgrade.
-
homeburrero
- Team HB
- Posts: 4894
- Joined: 13 years ago
The piston rod seal internal circlip is prone to corrosion and breaking, so I think you want that along with the 4 hole washer that goes behind it. The lever pin circlips are prone to flying across the room when you remove them, so no harm in having a spare set of them around.Rospresso wrote:1) Do I need to replace the stainless snap rings/washers ec.? I'm inclined to do it but I wondered if these parts actually wear.
P.S.
I would suggest adding a single hole steam tip and a temperature strip (especially the 60C - 90C low range strip) to that order.
Pat
nínádiishʼnahgo gohwééh náshdlį́į́h
nínádiishʼnahgo gohwééh náshdlį́į́h
-
Rospresso (original poster)
- Posts: 18
- Joined: 1 year ago
Speaking of, I pulled the group apart today and found this:
Much of the piston rod circlip is gone (no holes for the pliers anymore). The washer below is able to rotate so there is some hope, but: how do I get this out? Dig at it with a dental pick? Is there a solvent of some kind I should use to clean this up before replacing the seal?
I did end up ordering the replacement snap ring set, thankfully.
-
lassepavoni

- Posts: 134
- Joined: 1 year ago
Wow, that looks mean  . I'd apply a drop of WD-40 or similar, give it a couple minutes to creep in all the nooks and crannies, and then try to pry out the remains. A dental pick or a small-bladed but sturdy screwdriver might work. Maybe try to bend one end of the circlip to the inside, so that you have something to grab with needlenose pliers.
Regards, Lasse
LMWDP #744
LMWDP #744
-
lassepavoni
- Posts: 134
- Joined: 1 year ago
Almost forgot...
Second that.homeburrero wrote:It looks to me like the switch is wired incorrectly in both those pictures.
Regards, Lasse
LMWDP #744
LMWDP #744
