
Monitoring Brew Temperature - E61 Groups - Page 8
-
edwa

- Posts: 396
- Joined: 18 years ago
Eric,
I've read and re-read the posts and the downloadable instructions so please forgive me if you've answered this before.
When you describe the dimensions of value "D", the length of the paper clip from the copper seat to the intersection, they are all in decimal points. ie. 0.563". Yet the coat hanger method in the FAQ section doesn't seem as precise. That is a little confusing. My household tools can't measure anything that accurately and I'd have to check if my reading glasses could see anything beyond 1/32 of an inch. What do I need to purchase to correctly make the measurement or will a 1/16" scale ruler be sufficient?
I have no qualms about purchasing the Omega meter but the FUJI PXR3 digital display interests me. Does anyone know its read rate? Do you need a box to house it in? I assume it needs to be plugged into an outlet. Do they have on/off switches or do you just unplug them? Do the Omega thermocouples need special adapters to plug into the Fuji?
Sorry again, I've never been around thermocouples and temp controllers but I am mechanically adept, so I'm sure I can do the installation.
Thanks in advance,
Ed
-
erics (original poster)

- Supporter ★
- Posts: 6302
- Joined: 19 years ago
Good Morning Ed -
0.563 is simply 9/16", actually 9/16" = 0.5625". I will re-read the instructions myself from your vantage point and see what I can/should do.
The "paper clip" method would be suitable for, amongst other things, someone with normal to small size hands. The "thin coat hangar" method would be really suitable for anyone and might be easier to do because of its size. Both methods are simply a "poor man's depth gage".
"I have no qualms about purchasing the Omega meter but the FUJI PXR3 digital display interests me. Does anyone know its read rate? Do you need a box to house it in? I assume it needs to be plugged into an outlet. Do they have on/off switches or do you just unplug them? Do the Omega thermocouples need special adapters to plug into the Fuji?"
Answers:
I tried to find the read-rate specs on the PXR3 but was unable to - I would think 2/s and maybe even a little better. Heck, the inexpensive PID's claim 4/s and the HH506RA is 2.5/s.
You don't need a box but it does make the installation aesthetically pleasing. Boxes can be configured with a small toggle switch for on/off purposes or can be plugged in and left on (no problem there) or can take power from the machine. The PXR3 typically takes 1/4" stripped leads or it can be easily modified with a female miniature plug to accept a thermocouple with an attached male miniature plug.
Email me at erics@erols.com for any additional info pertinent to your particular situation.
Eric S.
-
major4579
- Posts: 3
- Joined: 17 years ago
I have a Fuji PXR3 controlling my Rosto roaster. According to the literature, the "Input Sampling Rate" is 0.5 secs. - is this what you were looking for?
-Marc
-Marc
-
edwa
- Posts: 396
- Joined: 18 years ago
Thanks major4579 and congratulations on your big win.
Did you put the Fuji in a housing? If so where did you buy it or did you build it?
Did you put the Fuji in a housing? If so where did you buy it or did you build it?
-
major4579
- Posts: 3
- Joined: 17 years ago
Yes the Fuji was mounted in a project box - remember I'm using the Fuji to control my home roaster, not my espresso machine. ANy inexpensive project box from Radio Shack would work fine. The Fuji PXR3 can be ordered with a number of options - one is power supply, either 100-240 VAC or 24V AC/DC.
One of these days I'll post some pictures.
As Eric S. noted there is no on/off switch (I use a separate one).
Hope this helps.
Marc
One of these days I'll post some pictures.
As Eric S. noted there is no on/off switch (I use a separate one).
Hope this helps.
Marc
-
JimG
- Posts: 659
- Joined: 18 years ago
FWIW, I have an Eric-style sensor wired to a Cal 3200 PID controller (used as a display only) on my Silvia. This particular controller is cheap, can be configured for C or F, can display 0.1 degrees, and allows the user to easily calibrate both sensor span and offset. I have the 3200 mounted in an external enclosure right below the "real" PID for my machine.
I have no idea what its read rate is, but in combination with the sensor, the 3200 gives me valuable real time temperature feedback for pulling shots and for knowing the all-important group temperature. I have good reason to believe the readings are accurate - I just don't know how quick or slow the response time is.
If you are budget-constrained, and only looking for a display, you might want to consider the Cal in lieu of the Fuji.
EDIT to original December 2006 post: After doing some more testing on the Cal 3200, I have learned that the display changes very slowly with input from the t/c. Although I still have the Cal on my Silvia, and still find it very useful, I think I would use a different controller next time.
Jim
-
stevendouglas
- Posts: 82
- Joined: 18 years ago
Bob,Bob Barraza wrote: In the Buyer's Guide to the A3 (The Bench Forum) Steve Robinson posted pictures during a partial tear down of the group Buyer's Guide to the Elektra A3
http://i6.photobucket.com/albums/y230/h ... CN0507.jpg
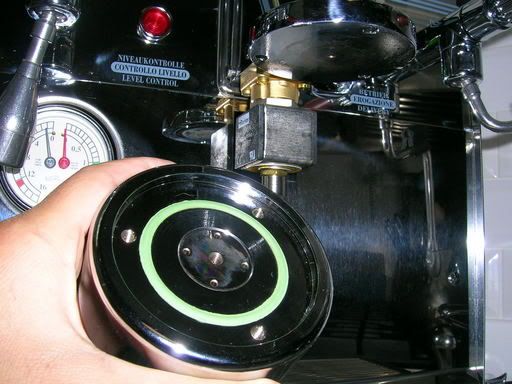
Once you remove the lower portion of the group by removing the three set screws from the top of the group, you will notice that there is an O-ring type of gasket that seals the two halves. I took a chance and ordered 30 gauge thermocouples that I intended to lay across the gasket and guided it down one of the four holes in the lower half of the group (the center hole is used to screw in the shower head and screen).
It worked! There was just enough room to run the wire between the two halves and still be able to get a good water seal. It may have required a bit more torque than without the TC wire, but it does not leak. I plan to order a new gasket to have on hand because if I ever have to disassemble for any reason, I suspect that the gasket will have deformed and create leaks. In the end, a small price to pay, and much easier than drilling the group.
By running the TC wire towards the back of the group, I was able to route it through the openings where the 3-way valve is located. From there, it runs down under the machine and along the countertop to the meter. Basically, unnoticeable.
<image>
After a very long time, I purchased the Omega H506RA. Just as you suggested it's a pretty simple set up to run the thermocouple into the group head as you show above.
HOWEVER, I don't believe that I used the correct thermocouple for the application. I used the one that came with the meter (SC-GG-K-30-36), which uses a glass braid insulation. The insulation shredded during the first uses and now the indications are erratic (it peaks at 208-209F even after the A3 has been idle for an hour or more, hangs out there and then drops as brew temp drops). I've ordered new thermocouples with a PFA insulation which should be more resistant to water and abrasion. Couple of questions:
1. Do you recommend the 30 gage or 36 gage wire? (I saw you used 30, but I thought the 36 might allow the o-ring to seal with less torque)
2. Did you use PFA insulated thermocouples or some other insulation?
3. Any other advice on this set up?
Thanks for your help. It takes me a while, but I do get there! I think that I'm really going to learn a lot with real-time temperature monitoring.
Steve
Steve Douglas
Sacramento, CA
Sacramento, CA
-
Bob Barraza
- Posts: 26
- Joined: 19 years ago
Steve,
The K type thermocouple that comes with the meter is inappropriate for use in the water path (as you have unfortunately found out). I used the 5SRTC-TT-T30-36 which is teflon coated. Unfortunately they only come as a 5-pack for $59. I agree that the 36 gauge would require less torque to get a good seal, but I was concerned that they might be more fragile.
Keep in mind that you will have to re-program the meter for the T type TC.
Since the meter is capable of simultaneously reading two channels, I took one of my spare K TCs that came with the meter, and I literally wedged it between the back of the group and the 3-way valve. This allows me to monitor both the temperature of the group as well as the brew water temperature. I did this on a lark, and I have found that knowing the temperature of the group is as important as knowing the temperature of the brew water.
This meter has three areas for display. I have set the top larger display as 'T1', and use this to display the brew water temperature. The lower left display as 'T2', group temperature. Finally, the lower right display as 'T1 - T2'. This lets me easily see the two temps and the difference.
I have been surprised by how much the group temperature can vary depending on idle time, frequency of shots, amount of rinsing, etc. Now I not only rinse to purge super-heated brew water but also to either cool or pre-heat the group which I like to have at about 200 deg. F. As you know, this group is a big chuck of metal that has a very significant heat capacity. As such, it is designed to buffer the brew water temperature. Hence, nailing the brew water temp with a cool group results in a cold shot which you can taste. Perhaps this only applies to this machine, but the group temperature is a 'loose cannon', and controlling it is well worth the effort. It may not be a problem with other designs, but I would not assume anything until I measured it.
Since you already have the dual channel meter and extra TCs, I would encourage you to try this simple setup. Let me know what you think.
Bob Barraza
LMWDP#0021
LMWDP#0021
-
stevendouglas
- Posts: 82
- Joined: 18 years ago
Bob,
I wish I would have asked you sooner. I ordered the K-type thermocouple but with the teflon coated insulation. It appears that the T-type has a smaller (yet completely adequate for anything related to espresso) temperature range than the K-type, but I didn't see any other differences. Are there any differences in response time or accuracy (the accuracy looked to be the same ~ 0.4% for both).
I ordered both the SC-TT-K-36-36 and the 30-gage, thinking exactly the same thing you did - the 36 gage might too fragile. I'll let you know how that turns out. I'll definitely try monitoring group temperature.
The thermocouples arrive today, so I'll let you know about the group and brew water temperature.
Thanks again for all of the information. I think that real-time monitoring of the brew (and group) is going to dramatically improve what's already a great machine. AND, it's likely to remove any GS-3 envy that I might otherwise have had!
Steve
Steve Douglas
Sacramento, CA
Sacramento, CA
-
Bob Barraza
- Posts: 26
- Joined: 19 years ago
Steve,
I'm afraid that you are asking questions beyond my level of knowledge. I would guess that the accuracy of either would be more than adequate for the intended use. The smaller diameter should in theory give a faster response time. Presumably the teflon coating will make it compatible with the hot water environment.
Another surprise for me is how little adjustments I need to make from day-to-day on my grinders (Mazzer Mini and Mazzer SJ) now that I am using the WDT and temperature monitoring. Several days go by before I make the most minute adjustment to account for aging, yet delicious shots just keep falling out. Trust me, all shots are carefully timed, volume checked, as well as bottomless portafilter monitored via pre-set mirror. This is possible due to the stability and reproducibility of the A3, but only apparent after I struggle to minimize the operator variability. The longer I have the A3, the happier I am with it. How often does that happen!
Bob Barraza
LMWDP#0021
LMWDP#0021
