
Espresso Machine Cleaning 101
-
cannonfodder

- Team HB
- Posts: 10507
- Joined: 19 years ago
Note: This entry has been published as a top-level article (November 6, 2005).
_________________
Word count: 1322
Agreement: I have read and agree to all the conditions of SwagFest 2005 ("the Contest").
Espresso Machine Cleaning 101
By Dave Stephens
You have your espresso machine and life is good. You have begun to master the art of espresso making, but after a week, that big shiny hunk of stainless steel is not looking too shiny anymore and the espresso is starting to develop an off flavor. Why? It's time to clean the machine inside and out!
The best coffee beans cannot make up for the impurities a dirty machine adds to your drinks. Coffee beans contain essential oils. While these oils are responsible for the rich crema that tops your espresso, it can also be responsible for a rancid off flavor that develops over time. Those oils emulsify and cling to and behind the water screen of your espresso machine, doubly so on brass surfaces. These oils also leave a film on the filter basket and portafilter. Over time this film will start to plug the holes of the filter basket and create deposits inside the portafilter spout. Luckily these impurities are relatively easy to remove IF you follow a regular cleaning schedule.
Keeping your espresso machine clean will not only help maintain the quality of your espresso but also extend the life of the machine. You should wipe off your steam wand after every use and run a water shot through your machine after every brewing session. You should also do a clean water backflush every 10 to 15 shots and at the end of a session as part of your cleaning routine. This article will concentrate on the more detailed cleaning routine that should be performed every two weeks or 20 to 30 shots, whichever comes first.
I must emphasize one very important note regarding this cleaning process. Only machines with a three-way valves can be cleaned using this method. If your espresso machine does not have a three-way valve, do not attempt to backflush as this article describes. Doing so can damage your espresso machine. Please consult your operator's manual to verify the presence of the three-way valve (sometimes called a three-way solenoid).
Eeewww, time for a cleaning...
Here we have a prime example of a dirty machine. There are milk deposits on the steam wand and coffee residue and oils on the shower screen. You should wipe off the shower screen and steam wand on a per-use basis using a moist cloth. Once a week (or more often depending on your usage), do a more detailed cleaning as described below.


Dirty shower screen................................Dirty frothing wand
And here's what a portafilter looks after a hard day at a busy cafe if it's not cleaned properly (shown next to new portafilter):

You will only need a few items to adequately perform your cleaning:

Time to flush...
Follow the recommended flush sequence of the detergent you are using. Joe Glo recommends running the pump five times in 15 second start/stop intervals. Once the portafilter is locked into place, engage the pump. The machine will build up pressure until the over-pressure valve opens and vents excess pressure back into the water reservoir or drip tray. You will notice a change in the pitch of your pump as the pressure increases. Turning off the pump automatically opens a pathway from the brew group to the drip tray; you will hear the distinctive 'whoosh' as the water escapes. This release of pressure will force the dissolved detergent back through the dispersion screen and the three-way valve. Flushing those spoiled essential oils out of the system will not only improve your espresso taste, but also clean the three-way valve of oils and grind deposits so it seals properly.

One trick to aid you in your cleaning after each session is the 'portafilter wiggle'. Loosen the portafilter and hold it in place on the brew head. Engage the pump. The blank filter basket will fill with water until it flows over the edge. Give the portafilter a wiggle to help clean the oils and residue from the group head gasket. Be careful, water will splash! You cannot see in the photo, but I have water splashing over the drip tray and onto my feet and floor. If your boiler is at full temperature, this water will be very hot, so take care not to burn yourself.

After the flush sequence and portafilter wiggle, remove your portafilter and drip tray. You will notice small coffee particles and a dirty brown tint to the water. This is the gunk responsible for that rancid flavor in your espresso.

Rinse out your drip tray and blank basket to remove any un-dissolved detergent. Reinstall the drip tray and lock you clean portafilter back into the machine and repeat the process. This time you will be flushing out any remaining detergent from the brew group. Refer to the instructions on your detergent for the recommended number of cycles (generally the same number of cycles as for the detergent; "rinse thoroughly" is the operative phrase).

Now that you have cleaned the internal workings via a backflush, you can now clean the exterior surfaces. Simply wipe the shower screen with your dishrag. If you elected to purchase a group brush, this is where you will use it. You need to clean any deposits from the portafilter gasket, the group head threads that the portafilter locks into and the rolled edges of the shower screen. Simply insert the brush into the group head and brush. I use a dishrag dipped into some dissolved flushing detergent. Once completed, do not forget to brush and rinse it with clean water to remove any residual detergent.
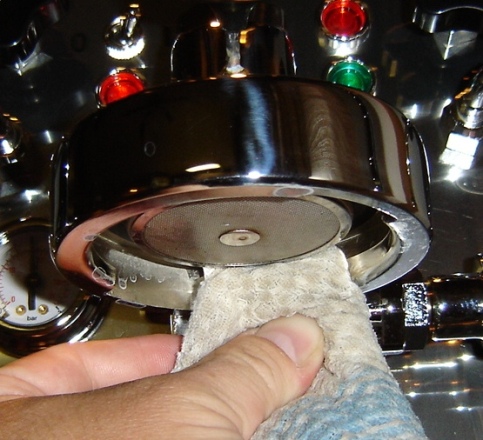
Be careful, that group head is hot!
Next clean the steam wand. Take the clean wet dishrag and wipe the exterior down. If you have a steam wand brush, clean the inside of the steaming wand. Unscrew the tip from the steam wand, dip the brush in an appropriate cleanser and run it up the steam tube. Most backflush detergents are quite toxic and not suited for this task. I recommend clean water. Urnex does make a product specifically designed to clean steam wands called Rinza. Remember to purge the steam wand after cleaning by opening the steam valve and venting it into an appropriate container for about thirty seconds.

Soak the portafilter, basket and steam tip...
Now that the espresso machine is nice and clean, turn your attention to the portafilter, basket and steam wand tip. Find a large container to hold them and pour enough water into the container to submerge them. Add some of your cleaning detergent to the water and stir to dissolve. Refer to the directions on your detergent to get the correct dosing for the volume of water, Joe Glo recommends 1 tablespoon per quart of very hot water. Place your parts into the detergent water and allow them to soak for at least a half hour.

After the soak, rinse all of the parts with clean water and wipe with a dishrag. If you have a group brush, use it to scrub the portafilter, basket and steam wand tip. A toothpick can be used to clean the steam holes on the steam wand tip.

Clean, shiny and ready to go...
Spic and span...
Wipe down the exterior of the espresso machine to remove any surface dirt and reassemble. Pull a seasoning shot to prepare your espresso machine for use and to insure there is no cleaning residue remaining in the system. Now you are ready to pull shots and froth milk until the next cleaning.

_________________
Word count: 1322
Agreement: I have read and agree to all the conditions of SwagFest 2005 ("the Contest").
Espresso Machine Cleaning 101
By Dave Stephens
You have your espresso machine and life is good. You have begun to master the art of espresso making, but after a week, that big shiny hunk of stainless steel is not looking too shiny anymore and the espresso is starting to develop an off flavor. Why? It's time to clean the machine inside and out!
The best coffee beans cannot make up for the impurities a dirty machine adds to your drinks. Coffee beans contain essential oils. While these oils are responsible for the rich crema that tops your espresso, it can also be responsible for a rancid off flavor that develops over time. Those oils emulsify and cling to and behind the water screen of your espresso machine, doubly so on brass surfaces. These oils also leave a film on the filter basket and portafilter. Over time this film will start to plug the holes of the filter basket and create deposits inside the portafilter spout. Luckily these impurities are relatively easy to remove IF you follow a regular cleaning schedule.
Keeping your espresso machine clean will not only help maintain the quality of your espresso but also extend the life of the machine. You should wipe off your steam wand after every use and run a water shot through your machine after every brewing session. You should also do a clean water backflush every 10 to 15 shots and at the end of a session as part of your cleaning routine. This article will concentrate on the more detailed cleaning routine that should be performed every two weeks or 20 to 30 shots, whichever comes first.
I must emphasize one very important note regarding this cleaning process. Only machines with a three-way valves can be cleaned using this method. If your espresso machine does not have a three-way valve, do not attempt to backflush as this article describes. Doing so can damage your espresso machine. Please consult your operator's manual to verify the presence of the three-way valve (sometimes called a three-way solenoid).
Eeewww, time for a cleaning...
Here we have a prime example of a dirty machine. There are milk deposits on the steam wand and coffee residue and oils on the shower screen. You should wipe off the shower screen and steam wand on a per-use basis using a moist cloth. Once a week (or more often depending on your usage), do a more detailed cleaning as described below.
Dirty shower screen................................Dirty frothing wand
And here's what a portafilter looks after a hard day at a busy cafe if it's not cleaned properly (shown next to new portafilter):
You will only need a few items to adequately perform your cleaning:
- Espresso machine cleaner (backflush detergent)
- Blank, blind, or backflush portafilter basket (different names for the same item)
- A clean kitchen towel and a dishrag.
Time to flush...
Follow the recommended flush sequence of the detergent you are using. Joe Glo recommends running the pump five times in 15 second start/stop intervals. Once the portafilter is locked into place, engage the pump. The machine will build up pressure until the over-pressure valve opens and vents excess pressure back into the water reservoir or drip tray. You will notice a change in the pitch of your pump as the pressure increases. Turning off the pump automatically opens a pathway from the brew group to the drip tray; you will hear the distinctive 'whoosh' as the water escapes. This release of pressure will force the dissolved detergent back through the dispersion screen and the three-way valve. Flushing those spoiled essential oils out of the system will not only improve your espresso taste, but also clean the three-way valve of oils and grind deposits so it seals properly.
One trick to aid you in your cleaning after each session is the 'portafilter wiggle'. Loosen the portafilter and hold it in place on the brew head. Engage the pump. The blank filter basket will fill with water until it flows over the edge. Give the portafilter a wiggle to help clean the oils and residue from the group head gasket. Be careful, water will splash! You cannot see in the photo, but I have water splashing over the drip tray and onto my feet and floor. If your boiler is at full temperature, this water will be very hot, so take care not to burn yourself.
After the flush sequence and portafilter wiggle, remove your portafilter and drip tray. You will notice small coffee particles and a dirty brown tint to the water. This is the gunk responsible for that rancid flavor in your espresso.
Rinse out your drip tray and blank basket to remove any un-dissolved detergent. Reinstall the drip tray and lock you clean portafilter back into the machine and repeat the process. This time you will be flushing out any remaining detergent from the brew group. Refer to the instructions on your detergent for the recommended number of cycles (generally the same number of cycles as for the detergent; "rinse thoroughly" is the operative phrase).
Now that you have cleaned the internal workings via a backflush, you can now clean the exterior surfaces. Simply wipe the shower screen with your dishrag. If you elected to purchase a group brush, this is where you will use it. You need to clean any deposits from the portafilter gasket, the group head threads that the portafilter locks into and the rolled edges of the shower screen. Simply insert the brush into the group head and brush. I use a dishrag dipped into some dissolved flushing detergent. Once completed, do not forget to brush and rinse it with clean water to remove any residual detergent.
Be careful, that group head is hot!
Next clean the steam wand. Take the clean wet dishrag and wipe the exterior down. If you have a steam wand brush, clean the inside of the steaming wand. Unscrew the tip from the steam wand, dip the brush in an appropriate cleanser and run it up the steam tube. Most backflush detergents are quite toxic and not suited for this task. I recommend clean water. Urnex does make a product specifically designed to clean steam wands called Rinza. Remember to purge the steam wand after cleaning by opening the steam valve and venting it into an appropriate container for about thirty seconds.
Soak the portafilter, basket and steam tip...
Now that the espresso machine is nice and clean, turn your attention to the portafilter, basket and steam wand tip. Find a large container to hold them and pour enough water into the container to submerge them. Add some of your cleaning detergent to the water and stir to dissolve. Refer to the directions on your detergent to get the correct dosing for the volume of water, Joe Glo recommends 1 tablespoon per quart of very hot water. Place your parts into the detergent water and allow them to soak for at least a half hour.
After the soak, rinse all of the parts with clean water and wipe with a dishrag. If you have a group brush, use it to scrub the portafilter, basket and steam wand tip. A toothpick can be used to clean the steam holes on the steam wand tip.
Clean, shiny and ready to go...
Spic and span...
Wipe down the exterior of the espresso machine to remove any surface dirt and reassemble. Pull a seasoning shot to prepare your espresso machine for use and to insure there is no cleaning residue remaining in the system. Now you are ready to pull shots and froth milk until the next cleaning.
